1. Enable detail billing export
The first step is to export your usage data to BigQuerry. If you have this feature already enabled, you can skip this step.
- In your GCP console navigate into Billing > Billing Export > BigQuery Export tab
- Find “Detailed usage cost block” and continue to Edit settings
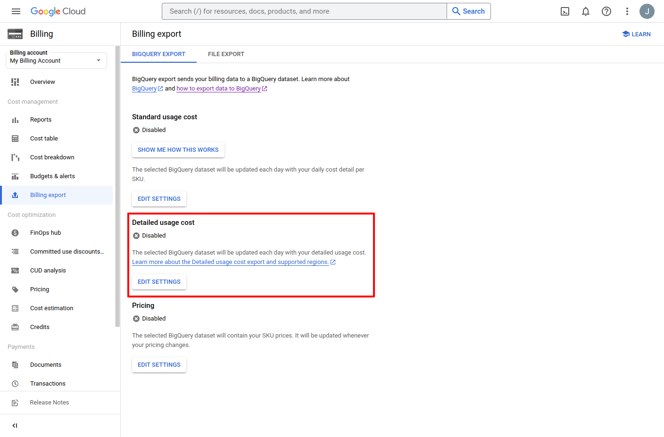
- Select the project, in which you want to collect the detailed usage data. We highly recommend creating new specific project only for this purpose, so it does not mix with any other currently running projects. Than you can select the dataset in which the data will be saved. If you are not utilizing Detail usage cost elsewhere, we recommend you set a new project and dataset for this.
-
Finish the settings and save. From this point, Google will start saving your usage data daily into the selected BigQuery dataset. Data are uploaded from Google usually during the day.
2. Connect anomaly detection
Once you have your billing export ready, you can connect our application with your dataset via the service account.
- Log in to Anomaly detection at https://anomalies.revolgy.com
- Currently we are running close private beta. Please contact us first to grant you access to our tool
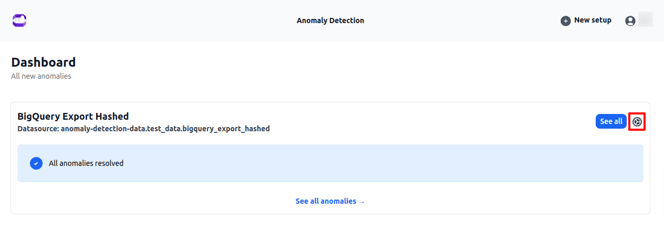
- Navigate to “New setup” on top of the app
- The app will generate a Service account for you in the format of a long email address - you will need to add this service account to have access to the Detail usage data export Project and Dataset which we created in Chapter 1
- In your Google console navigate to IAM & Admin > IAM > Permissions tab. Be sure you selected the correct project which contains the sage data in the top dropdown menu.
- Click on the Grant access button
- As a participant, add the email address of the service account our App generated in Step 3
- Assign roles “BigQuery - Data Editor” and “BigQuery - Job User” to the given Service account for the project, where the detail export is stored. Save changes
- In Anomaly detection fill in the human-readable name of the Group of resources you want to add and then copy and paste the project id of the Google console project we created, datasetID we created, and tableId which contains the usage export. You can find all of this when you open the BiqQuery in Google Console.
- In case you want to send the newly found anomalies notification anywhere like Zappier or Make, you can add your webhook URL as well. This step can be done later as well.
- Once you have everything filled, you can Test the connection and save it.
At this point, our app will check if there is enough data to generate a machine learning model for you. In case there is not enough data, app will let you know and will automatically try to create model within next 7 days.
In case there is already billing data present in the table, we generate the Machine learning model of your data on first and than monthly on every first day of the month, and compare the daily data with it. Anomalies found will be sent to the app and a webhook will be triggered for each newly found anomaly.
Please note, that at the beginning of the usage of our app due to a lack of historical data, the model is not able to check anomalies correctly. This usually gets better each week with maximum precision after a month or so.
As well, we will start automatically check difference of each pair of Project and SKU between weeks. Each Tuesday (Due to delay of Google billing data) we calculate the difference and if it pass configuration criteria, we will notify you.
3. Configure your detections
Disclaimer: Throughout this description you might notice that a lot of checks are run on the second day of their respective periods or that they have a 1-day delay. This precaution is set due to Google having a delay up to 24 hours to transfer all of the data into the billing export table. So our system is set up to wait for all this data to be ready so the checks are correct.
- In-app navigate to the Group of resources you are tracking and click on the configure icon
- You can configure following types of detections:
- Anomaly model
Anomaly detection coupled with machine learning model. It learns from your data and can find anomalies over time with greater accuracy, specifically related to your business model and billing fluctuations.- This detection runs everyday at 9:30 AM CEST with a 1-day delay.
- Example: On Thursday morning, it checks for anomalies on Tuesday.
- The model is retrained every month on the 2nd day or it can be manually retrained in the settings.
- Week over Week difference check
Weekly expense comparisons. The app compares differences in expenses by weeks and can inform you of changes far before your invoice arrives.- Runs every Tuesday at 9:00 AM CEST.
- It compares last calendar week with the previous one.
- It groups data by <Project, Sku>, so it can notify you which pair <Project, Sku> has a significant increase or decrease.
- New Skus check
The app watches for new paid SKUs in the console. If it has, you will be notified immediately.- Runs everyday at 9:10 AM CEST with a 1-day delay.
- It checks for new pairs of <Project, Sku> regarding to the previous 14 days.
- Example: On Thursday morning, it checks for pairs of <Project, Sku> that occurred on Tuesday and that have not appeared in the previous 14 days.
- Unit Price Changes
If the unit price of any of the services or tools you use in the console increases, you will receive a notification and can consider, for example, another solution.- Runs everyday at 9:05 AM CEST with a 1-day delay.
- It groups data by <Project, Sku>.
- Example: On Thursday morning, it checks for pairs of <Project, Sku> that have a different Unit Price on Tuesday compared to Monday.
You can choose which of these 4 detections you want to see in your dashboard. Just toggle the blue button for each of the detection to the left if you don't want to see them. - Anomaly model
- Choose the sensitivity of your detections
- Anomaly Model
- Threshold (from 0 to 1, default 0.95) - Our model works with the calculation of probability, that the daily data are anomalies - by increasing the number, the app will be less sensitive, by lowering this number app will be more sensitive, and send more anomalies to check.
- Min Difference - Set what will be the minimal daily in your billing currency difference the app should consider as an anomaly. IF there are anomalies lower that this amount, we will not notify you about them and ignore them
- WoW difference check
- Threshold - Difference in percentages, when we will notify you about such WoW change. Example - previous week SKU in project X cost 100USD, now it is 120USD. If you set the threshold to 15%, we will notify you. If you set the threshold to 30%, we will not notify you.
- Min Sum - Amount of cost per week, which we will ignore difference check. For example - if you set Min Sum for 10 USD, if there is an anomaly from 1 USD to 9 USD, it will be ignored. On the other hand, if the WoW change will be from 11 to 1 or from 1 to 11, we will trigger the WoW check as an alert.
- Unit Price Changes
- Threshold - Percentage difference between the previous and the new unit price.
- Min Unit Price - Either the previous or the new unit price has to be higher than this number to trigger a notification. You can filter only bigger changes with this particular setting.
- Example 1:
- Min Unit Price: 1
- Previous Unit Price: 0.5
- New Unit Price: 0.75
- Result: NO notification
- Example 2:
- Min Unit Price: 1
- Previous Unit Price: 1.5
- New Unit Price: 0.75
- Result: Notification sent
- Example 3:
- Min Unit Price: 1
- Previous Unit Price: 0.5
- New Unit Price: 1.25
- Result: Notification sent
- Example 1:
- Anomaly Model
4. Webhook setup
In case you want to send the newly found anomalies notification anywhere like Zappier or Make, you can add or edit your webhook URL here. You can test the webhook as well (use https://webhook.site/) which will trigger sample webhook call for your detections.The format of the webhook is the following:
{ "type": "ANOMALY", //Type is either ANOMALY or WOW_CHECK
usageTime": "2023-11-15T00:00:00.000Z", "description": "Test timeSeriesId" "difference": 40647420.285667,
"projectId": "ProjectXY",
"skuId": "skuXY",
"detailURL":
"https://console.cloud.google.com/billing/billingAccountXY/reports;timeRange=LAST_30_DAYS;grouping=GROUP_BY_SKU;projects=projectXY?project=projectXY",
"difference": 40647420.285667, "payload": { "projectId": "xyzabc=", "projectName": "xyzabc=", "skuId": "2A2A-1111-1AA1", "billingAccountId": "xyzabcd=", "skuDescription": "Cloud SQL for MySQL: Regional - vCPU in Americas", "labels": { "firebase": "enabled" }, "currency": "EUR",
"diffRelative": 3566621.967645492 }}
5. Member invites
In case you want to share your configuration with other people, you can add their email address in the Access section of the configuration. Please keep in mind the emails needs to be whitelisted first.
6. Snooze List
In your dashboard, you can set a particular project or pair (project, SKU) to be Snoozed / Ignored. You can set Snooze for 7 days, 30 days, 6 months of forever. This means, that even though we will find anomaly or WoW check alert, we will not show and notify you about them. This is useful for testing projects or for resources which trigger regular false alarms due to their volatility/
Anomalies and WoW checks that belong to a snoozed project or a pair (project, sku) won't be shown in lists and won't be sent to the webhook. After the until date they will start appearing again.
You can manage the list and remove items from it here as well.